

Best Bag Organizers for Work and Travel: A Buying Guide
Your phone is ringing, your keys have slipped beneath a charger, and the glasses you need are somewhere under a folder. You've got enough room in your bag, but you can't reach what you need without unpacking it. Adding more pockets won't necessarily fix that.
The best bag organizers keep your load stable, let you retrieve essentials with minimal effort, and hold up without adding unnecessary bulk. Start with the smallest system that solves your actual problem, whether that's a structured laptop insert, a cable pouch, or a protective case for fragile eyewear.
Table of Contents
- Quick Picks by What You Carry
- Organizer Types and How Each Is Built
- Sizing an Organizer to Your Bag
- Materials and Linings That Hold Up
- Layout Rules for Weight and Quick Access
- Testing Accessibility and Weight Before You Buy
- Choose the Smallest Organizer That Lasts
Quick Picks by What You Carry
Best bag organizer by what you carry
| What You Carry | Best Organizer Type | Key Feature | Typical Layout |
|---|---|---|---|
| Laptop and documents | Structured briefcase insert | Padded sleeve with rigid base | Laptop sleeve, separate document slots, pen channel |
| Daily work essentials | Zip pouch insert | Clear mesh pockets | Shallow pockets arranged around a main compartment |
| Travel toiletries | Toiletry organizer | Separate wet and dry sections | Divided compartments plus mesh |
| Tech cables and chargers | Tech organizer pouch | Elastic loops and mesh | Charger pocket, cable loops, enclosed accessory pocket |
| Pens and notebooks | Pen case or hard pen box | Rigid slots with cotton or suede lining | Individual pen channels beside notebook storage |
| Eyewear | Padded eyewear case | Rigid shell with microfiber lining | Individual pair storage or divided slots |
Treat these as layout targets, not specifications that every product in a category meets. A pouch described as a tech organizer might have excellent cable loops but nowhere suitable for a bulky power adapter. A toiletry bag might separate bottles without containing a leak.
Match the organizer to the bag you already carry. Our Bags category includes briefcases, backpacks, duffle bags, portfolios, wheeled bags and toiletry bags. Each creates a different fitting problem: a slim portfolio needs flat storage, while a duffle needs something you can identify and lift out without disturbing clothing.
Mixed loads need separate solutions
A work bag carrying a laptop, charging equipment and glasses rarely benefits from a single densely divided insert. A laptop sleeve plus a removable cable pouch lets you leave charging equipment behind when you don't need it. Keep glasses in a protective case rather than asking a fabric pocket to resist crushing.
For a device-heavy load, use our tech organizer travel case guide to assess the pouch format against your actual chargers and cables. Don't select a larger organizer just because its photograph shows an impressive collection of accessories.
Before buying, answer these questions:
- Frequent access: What do you reach for most often during a typical day?
- Damage risk: What do you carry that could be scratched, bent, crushed or contaminated in transit?
Those answers determine which table row deserves priority. Everything else should earn its place.
Organizer Types and How Each Is Built
Structured inserts use a rigid or semi-rigid base, upright dividers and, where appropriate, a padded device sleeve. They suit document-heavy work bags because they support folders and stop the organizer collapsing when you remove an item. Their main drawback is their fixed footprint: an insert that works in a rectangular briefcase may fight the tapered sides of a backpack.
Soft pouches use flexible walls, mesh and elastic retention. They accommodate irregular chargers and toiletry bottles without imposing a box shape on the bag. However, an empty fabric cavity isn't much of an organizer if everything collects at its lowest point.
Hard boxes and rigid cases provide the strongest crush protection of these families, assuming sound construction. They're useful for eyewear, valuable pens and watches, but their shells occupy space even when partly empty. Soft pouches generally offer the lowest weight and greatest flexibility; structured inserts prioritize a stable layout, while hard cases sacrifice packing efficiency for protection.
Construction that controls the contents
A controlled treadmill comparison of backpack designs examined a compartmentalized pack with elastic internal sections that retained textbooks near the body rather than letting them settle at the bottom. That's a useful construction benchmark, but it isn't proof that every compartmentalized organizer reduces fatigue.
Examine what holds each object in place:
- Base stiffness: Press the base and check whether it folds under the intended contents.
- Retention: Look for loops or dividers that hold securely without compressing delicate parts.
- Closure: Check whether zipper fabric can catch loose leads, pen clips or lining.
- Access style: Choose open-top access for supported, frequently used items and zipped containment for pieces that could spill.
The illustration also shows modular dividers, an adjustable alternative to fixed channels.
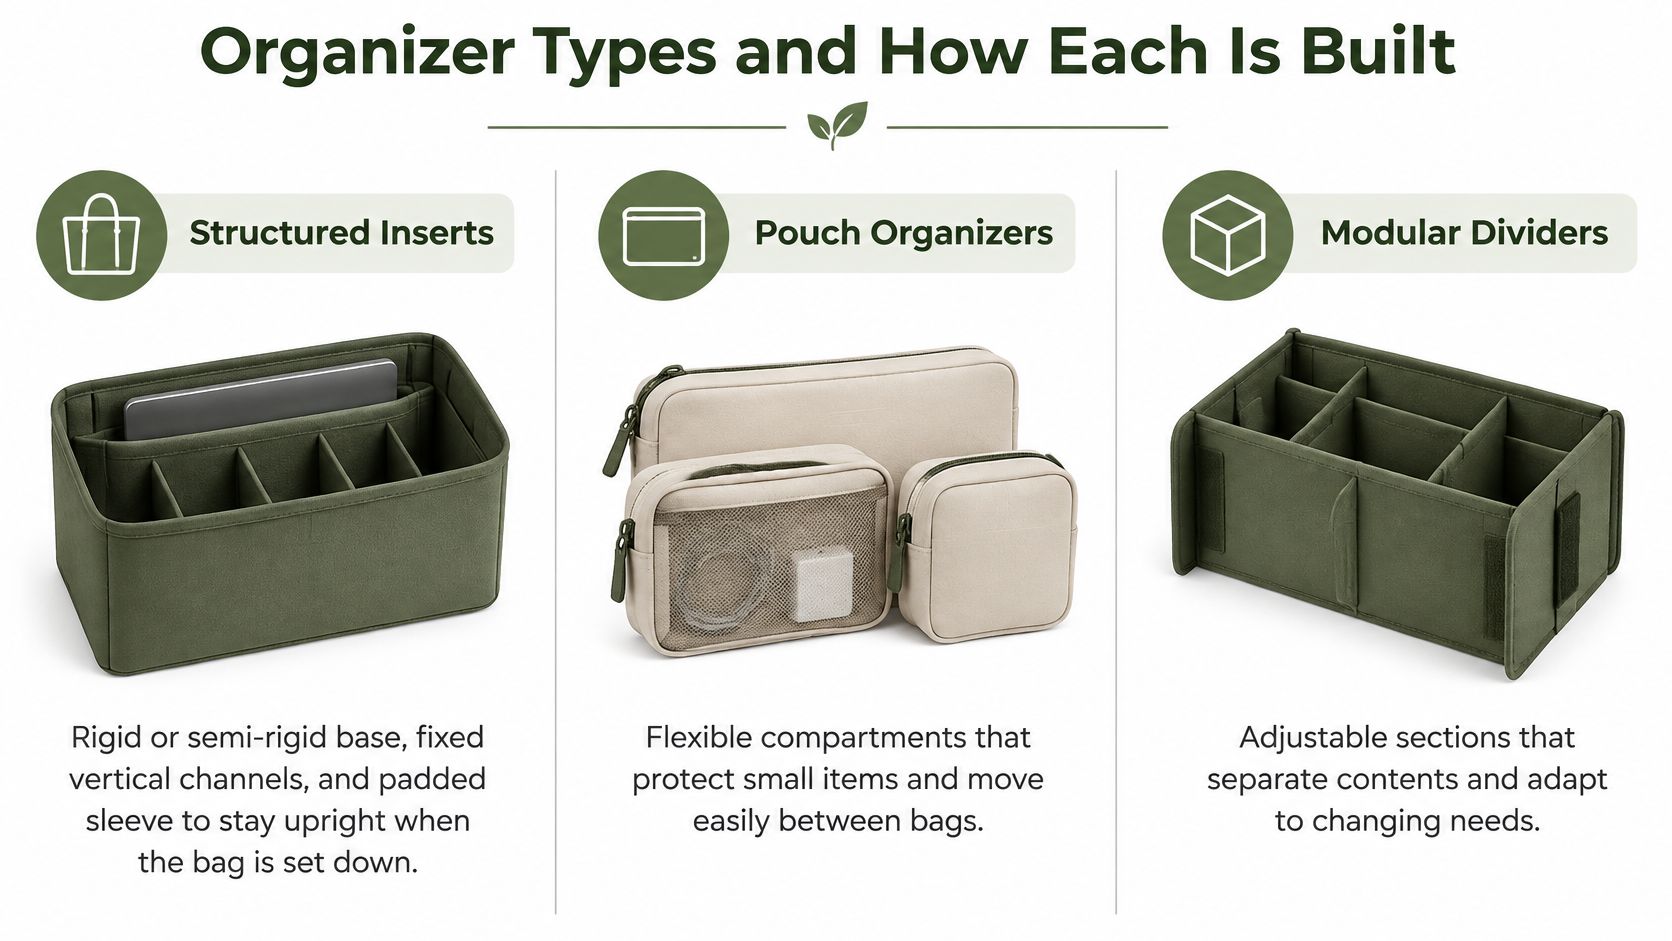
Construction check: A divider is useful only if it separates or restrains something you actually carry.
Our pen range includes single pen cases, zipper pen and pencil bags, and hard pen boxes. Our eyewear range includes single pair cases and eyewear organisers. For a writing instrument you use throughout the day, compare a pocket pen holder with a fully enclosed case before committing to the extra enclosure.
Sizing an Organizer to Your Bag
Measure the bag's usable interior, not its advertised outside dimensions. Use a flexible tape for the interior walls and a ruler for the base. Record width, height and depth at the narrowest points, including beneath the zipper and beside any built-in sleeve.
If you can only obtain exterior measurements, account for wall thickness, padding and internal pockets. Don't subtract those again from a direct interior measurement. A tapered opening can be the limiting dimension even when the base looks generous.
Next, measure your actual belongings. A laptop's advertised screen size doesn't tell you its chassis width, thickness or corner shape, and a sleeve's external dimensions don't tell you its usable opening.
Item sizes and clearance for organizer pockets
| Item | Size or Clearance |
|---|---|
| Ballpoint or fountain pen | Measure capped length and widest diameter, including the clip; leave room to grasp it |
| Eyewear case | Measure the closed case's width, height and depth; allow it to pass through the opening without squeezing |
| Power bank | Measure your own unit, including any cable that will remain connected |
Check the packed footprint
Use a cardboard template for the organizer's base before buying. Place it inside the bag alongside anything that won't live in the organizer, such as a water bottle or lunch container. This reveals conflicts that an empty-bag measurement misses.
Follow this fitting sequence:
- Measure the interior: Include the opening, base and any narrowing near the top.
- Measure the contents: Add handling clearance rather than aiming for a friction fit.
- Check closed-bag fit: Confirm the loaded organizer sits below the zipper without pushing the lining or shell outward.
Too tight, and you'll pull against the closure every time you pack. Too loose, and the organizer can tip or rotate. The correct fit is supported without being wedged in place.
A briefcase or portfolio generally suits a flat, structured insert. A backpack can accommodate a body-side sleeve and removable pouch, while a tote or duffle often benefits from flexible storage that follows its interior shape. Use our leather laptop briefcase guide to compare the carrying format, then verify the exact bag and device specifications.
Materials and Linings That Hold Up
Full-grain leather suits an organizer you'll handle regularly and keep for long-term carry, particularly when appearance matters outside the bag. It usually adds more weight than a lightweight textile pouch. Shape retention depends on thickness, reinforcement and construction, not on the leather being tanned.
Nylon makes sense when low weight and flexible packing matter most. A coated nylon shell can resist splashes, but don't assume that its seams and zipper make the finished pouch waterproof. Polyester is often a practical choice for cable and toiletry storage, especially when the finished fabric is easy to wipe clean.
Compare the complete product rather than ranking materials in isolation. Thick fabric, padding and oversized hardware can make a synthetic pouch heavier and bulkier than expected.
Choose the lining for the object
The lining is the surface your belongings touch. Select it according to abrasion risk, cleaning needs and how tightly the contents sit.
- Cotton: A soft choice for documents and pens, though spills can leave visible stains.
- Microfiber: Useful against eyewear and polished watch surfaces; keep it free of grit and trapped debris.
- Suede: Offers a grippier surface for pen storage, but marks and product residue need careful handling.
- Polyester: Practical where wipeability matters, although the weave and finish determine how smooth it feels.
Our briefcases are available with cotton or polyester lining, and our leather pen cases come with cotton, microfiber, suede or polyester linings. The suede lining versus fabric comparison can help you choose between a grippy interior and a smoother, easier-clean surface.
Don't put a polished object against exposed zipper teeth or metal fittings, regardless of how soft the surrounding lining feels.
For cosmetic storage, choose the washable or wipeable interior before deciding on decoration. If you're considering personalization, Get Spliced's tips for monogrammed cosmetic bags offer a relevant companion resource for that choice.
Finish by inspecting seams, corners and zipper attachment points. We use heavy-duty stitching to make our bags durable, but your fitting check should still include loose threads, exposed edges and closures that snag when loaded. If a seller publishes a zipper load rating, compare it with the intended use; otherwise, don't invent a capacity from the zipper's appearance.
Layout Rules for Weight and Quick Access
Dense contents positioned far from your torso create a longer lever arm, pulling the load backward and encouraging compensatory forward lean. The University of Wisconsin backpack ergonomics guide recommends multiple compartments, the heaviest items closest to the back, lighter objects farther outward, and a backpack load below roughly 10% of body weight as a practical limit.
That backpack guidance isn't a weight allowance for a hand-carried briefcase. For other bag styles, use the placement principle without treating the percentage as universal.
Load zones and where items belong
| Zone | What Goes There | Placement Rule | Why |
|---|---|---|---|
| Body-side zone | Laptop, tablet, notebook | Against the back panel or the side nearest your body | Keeps dense load near the center of mass |
| Central vertical channels | Documents and folders | Upright and snug | Stops sliding and crushing |
| Outer pockets | Pens, cards, cables | Lightest items furthest out | Quick access without digging |
| Small front pocket | Keys and earbuds | Shallow and visible | Fast retrieval |
The same arrangement can work inside a structured tote, provided the insert remains supported.
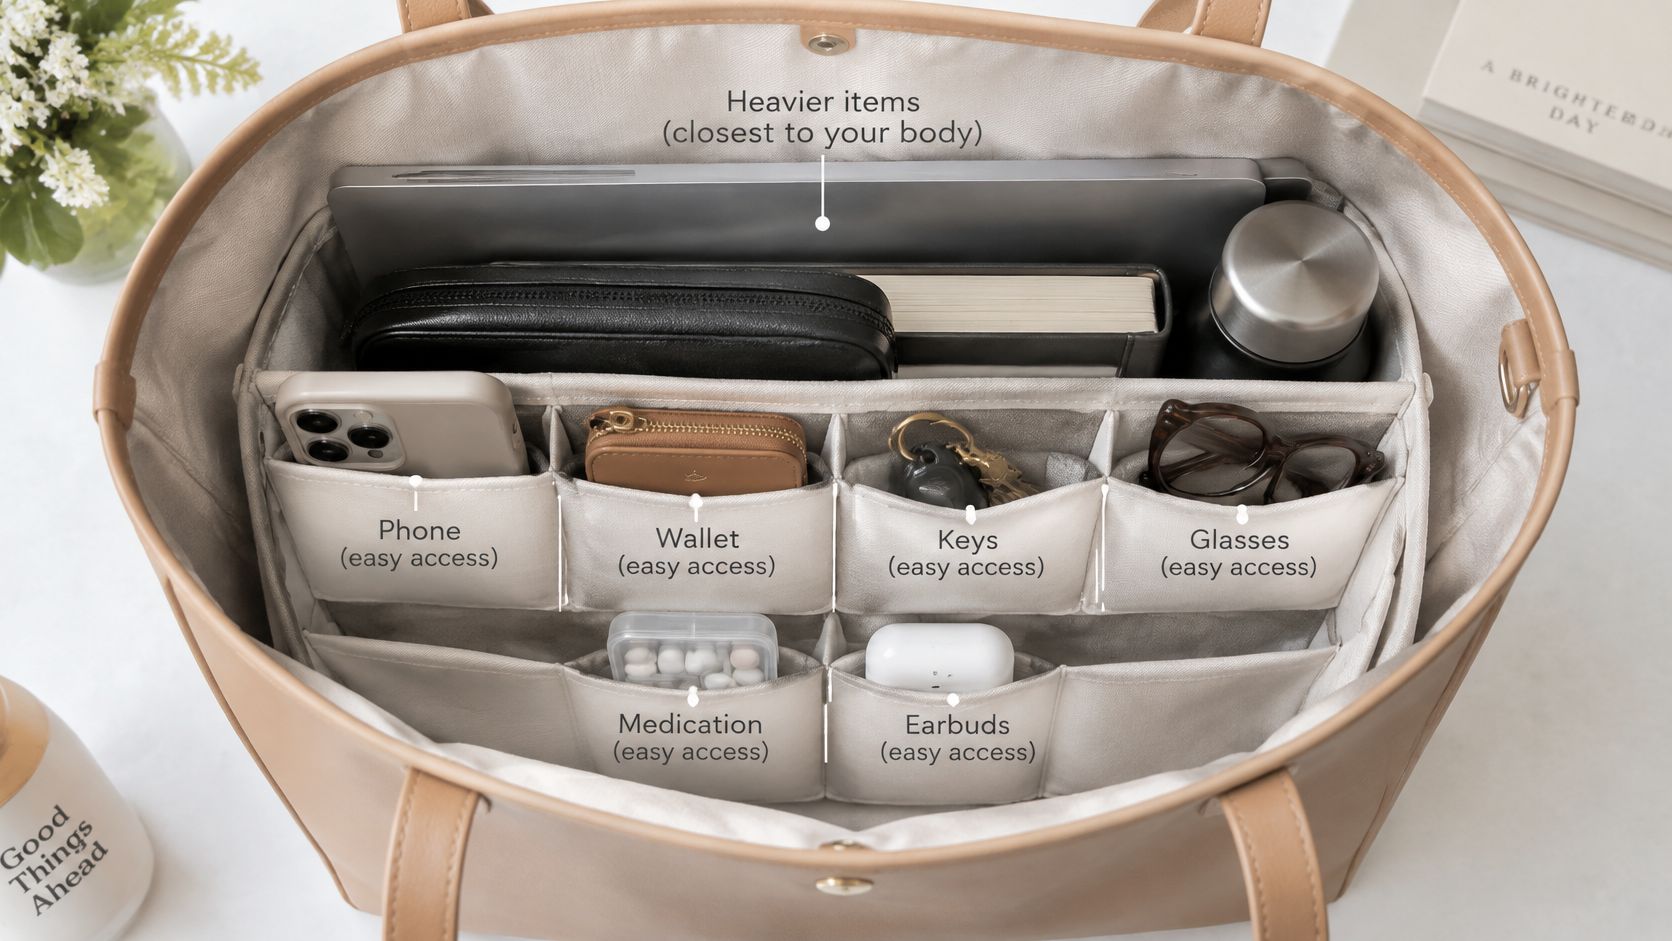
Pack from the body outward
Slide the laptop into the sleeve nearest the carrying side, then place folders in the central channels. Keep their edges below the closure so the zipper doesn't scrape or bend them. Add pens and cards to accessible peripheral pockets.
Put keys in their assigned front pocket, separated from screens and lenses. Lightweight cables can sit farther outward, but a dense charging brick belongs nearer the body rather than in an outer bulging pocket.
Close the bag and walk with it in your normal carrying position. Then set it down as you would beside a desk or under a seat. Check whether the insert stays upright and whether retained objects remain in their zones.
Retention matters as much as initial placement. Elastic, compression panels or close-fitting dividers should stop heavy contents migrating during movement. Don't tighten them across a laptop lid or against an eyewear frame.
For families applying a similar fixed-home routine to school bags, InchBug's guide to keep homework and school essentials organized provides a useful related resource.
If the bag pulls backward or you feel objects slide when you set it down, reposition the heaviest item nearer the carrying side and check its retention. Adding another pouch won't correct a badly placed load.
Testing Accessibility and Weight Before You Buy
An organizer can look orderly on a desk and still be awkward at a station, reception counter or airport gate. Test it with your phone, wallet, keys, glasses, medication and earbuds, using their normal cases and containers.
The Fabulive arthritis-friendly handbag report identifies empty weight, strap configuration, handle shape, closure force, opening width, visibility and carrying modes as relevant usability variables. Treat it as an accessibility checklist rather than a clinical assessment or a guarantee that a particular design will suit you.
Run a realistic retrieval test
Weigh the empty bag and organizer separately on a kitchen scale, recording the results in grams. Load your everyday belongings, not whatever happens to be nearby. Wear the bag normally and retrieve each essential while standing.
Repeat with a hand supporting the bag by its handle. Note whether you can open the organizer, identify the object, remove it and secure everything again without setting the bag down. Only use carrying positions that are comfortable and safe for you.
Use this scorecard to compare candidates:
| Test | What to Record | Warning Sign |
|---|---|---|
| Organizer weight | Empty weight in grams | Added structure you don't use |
| Opening width | Usable opening with the bag supported | Knuckles catch or fabric collapses inward |
| Zipper force | Smooth pull, bracing needed, or uncomfortable effort | Jerking, snagging or painful grip |
| Pocket depth | Whether the object remains visible and graspable | Fingertip searching beneath other items |
| Contrast | Visibility of dark and small belongings | Black accessories disappear against the lining |
| One-handed retrieval | Time and failed attempts for each essential | Repeated repositioning or dropped objects |
The checklist below highlights the items and handling features worth testing together.
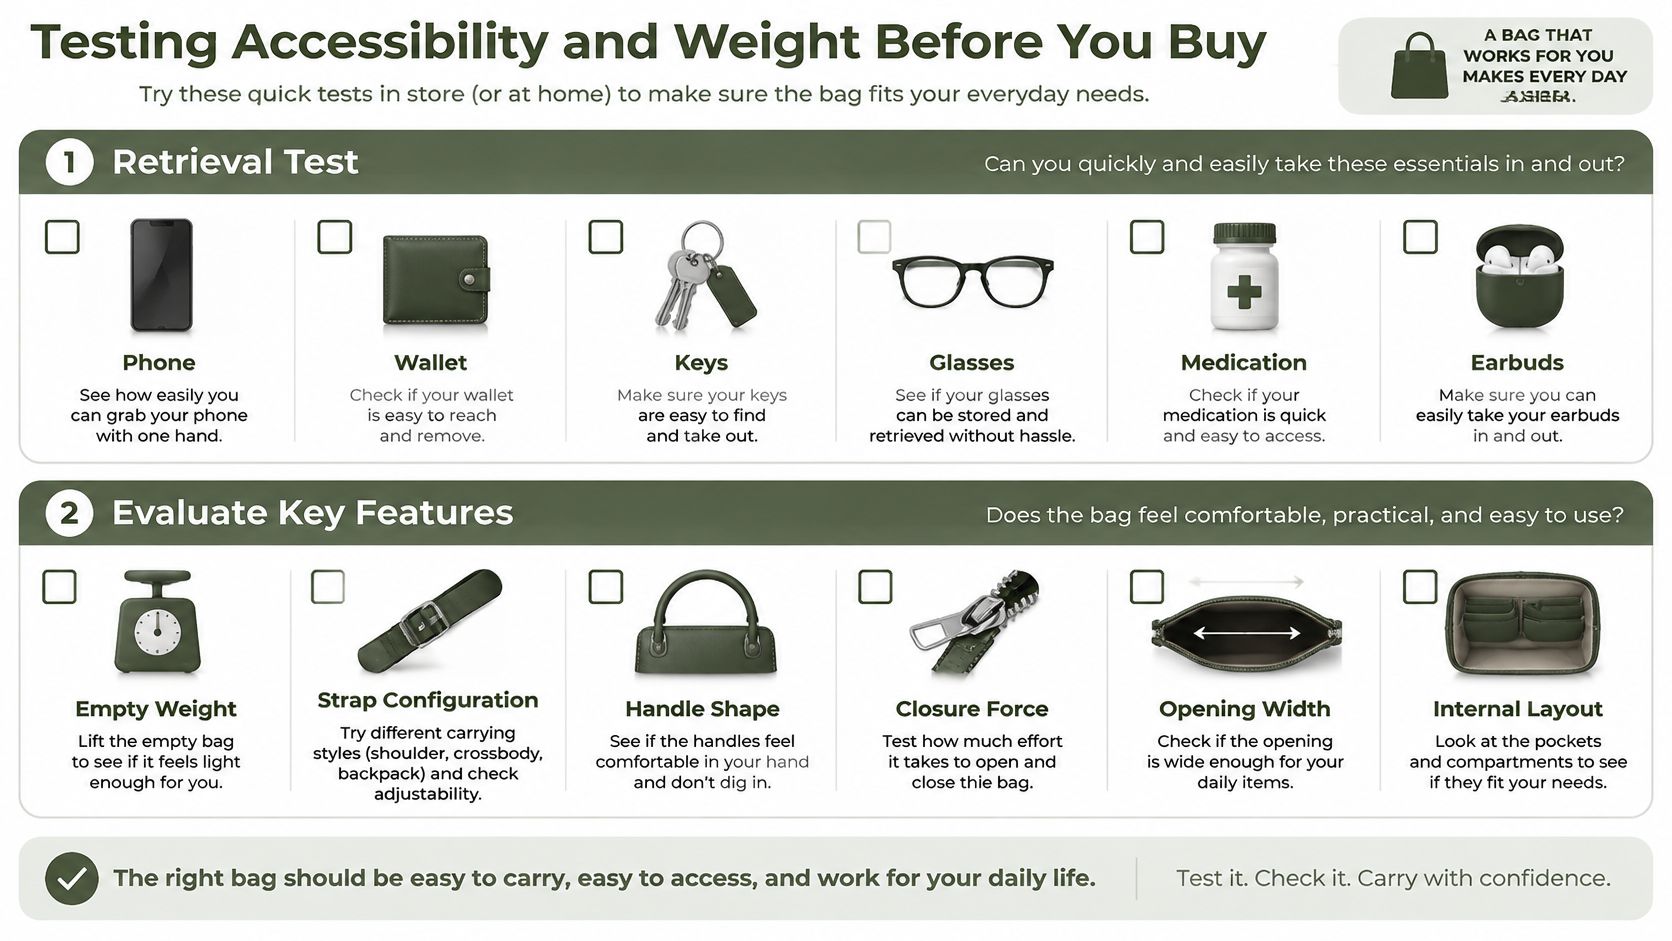
Read the failures, not just the stopwatch
A deep pocket can conceal a small item and force repeated grasping. A very tight pocket creates the opposite problem: you can see the object but can't get enough purchase to remove it. Eyewear and medication need a secure location that doesn't demand forceful extraction.
Choose your own retrieval target based on what feels reliable, not a universal speed claim. A slightly slower, controlled movement is preferable to catching a glasses arm or dropping a pill container.
Accessibility priority: If you have reduced grip strength, arthritis or limited wrist mobility, give comfortable closure force and opening width more importance than compartment density.
If a design fails the one-handed test, try a wider opening or supported open-top pocket, even if that means fewer compartments. Security still matters, so check that accessible items remain contained when you carry the bag.
Choose the Smallest Organizer That Lasts
The best bag organizers don't encourage you to carry more. They protect what you need and eliminate the awkward handling that made you shop for an organizer in the first place. A durable pouch you move between compatible bags can be more useful than a collection of overlapping kits.
Compare useful organization per added gram by counting only the compartments you'll use and dividing that count by the organizer's measured empty weight. Treat the result as a comparison aid, not a complete quality score. A protective eyewear shell may justify its weight even though it provides little compartment variety.
An insert can shield a bag's lining from pen clips, charger corners and repeated handling. It can also cause problems if rigid divider edges rub against the lining or hardware presses into the shell. Look for covered edges and a supported fit, and remove redundant packaging rather than filling every available space.
Maintain the parts that do the work
Choose construction you can inspect and care for. Our leather bag quality guide provides another reference when comparing the bag around the organizer.
Use this condition-led maintenance routine rather than applying products on an arbitrary calendar.
Organizer maintenance for daily and travel use
| Task | Daily Carry | Before a Trip |
|---|---|---|
| Empty and wipe inserts | Make it part of your weekly bag reset | Before packing |
| Condition leather | Inspect regularly; condition when appropriate for the leather and finish | Check for dryness; don't apply unnecessary product |
| Check stitching and zips | Include in a monthly inspection | Check before packing |
| Air out linings and re-check fit | After damp use and during routine inspections | Air after the trip and reassess the packed fit |
Brush out crumbs before wiping, let damp linings dry fully, and test any leather conditioner on a discreet area. Don't lubricate a sticky zipper with an improvised oily product that could migrate onto documents or fabric.
Buy for the load you have
Choose the bag first, then list your most-used items and the belongings that need protection. Select the smallest organizer that accommodates them comfortably. Confirm the layout and retrieval test before adding another case.
After a period of normal use, remove anything that remains empty or duplicates a built-in pocket. When comparing our briefcase and toiletry bag lines, check dimensions and available linings against your list rather than choosing by exterior appearance alone.
The right endpoint is a bag you can close, carry and use without rearranging its contents at every stop.
Grainmark Leather offers work and travel bags alongside tech organizers, pen cases and protective eyewear storage. Visit Grainmark Leather to compare formats, dimensions and linings against your everyday load, then choose the smallest durable setup that passes your fit and access checks.