

Tech Organizer Travel Case: How to Choose
Buying the smallest pouch that zips shut is poor advice for a frequent flyer. At the security conveyor, with a laptop brick, phone cable, earbuds, and power bank loose in your briefcase while the tray fills up, compactness isn't what you need. You need to see what you're carrying and reach the battery without emptying the bag.
Table of Contents
- What a Tech Organizer Travel Case Is For
- Size and Capacity for Common Device Sets
- Power Bank Rules Inside a Carry-On Case
- Pockets Packing Order and Care
- Full-Grain Leather for a Case That Lasts
- Match the Case to the Trip You Actually Take
What a Tech Organizer Travel Case Is For
A tech organizer travel case is a structured insert for a carry-on, briefcase, or backpack. It gives small accessories assigned places, rather than gathering them in a soft sack where everything settles beneath the heaviest charger.
Consider a typical work trip. You carry a USB-C laptop, a phone, wireless earbuds, perhaps a tablet, and the plugs needed at your destination. Some accessories share a charger, but the laptop lead, earbud case, regional adapter, and power bank still have different shapes and protection needs.
The useful case is a charging kit you can scan, not the smallest pouch you can stuff. Open it on a hotel desk and you should immediately know whether the laptop cable is missing, whether the adapter is seated properly, and whether anything looks damaged.
Preserve the accessories you already own
Cables and adapters can leave service while the devices they support still work perfectly. A lead gets kinked beside its connector, a charger disappears beneath a hotel bed, or an earbud case gets crushed against a plug. Assigned compartments address those ordinary failure points.
The scale of electronic disposal is much larger than travel accessories: the United Nations' Global E-waste Monitor 2024 reported that the world generated 62 million tonnes of electronic waste in 2022. An organizer won't solve that problem, but preserving a working cable is more useful than replacing it because it was lost or packed badly.
Buy space for separation and inspection, not space to carry every spare accessory you own.
The practical distinction is between storage and readiness. A storage pouch can hide equipment until you need it; a travel charging kit should let you check its contents before leaving a desk, boarding an aircraft, or repacking a briefcase.
Start with the rigid items that determine capacity. Battery access, pocket construction, leather quality, and your packing habits matter more than an impressive pocket count.
Size and Capacity for Common Device Sets
Tech organizer size by device kit
| Kit | Typical contents | Length | Depth | Dedicated pockets |
|---|---|---|---|---|
| Phone day | Cable, earbuds, small wall plug | Fits the loosely coiled lead beside the earbud case | Clears the wall plug without lid pressure | Separate flat sleeves and a short cable channel |
| Commuter | Phone kit plus slim GaN charger and small power bank | Fits charger and bank in separate positions | Clears the thicker rigid item with the divider closed | Battery pocket plus cable channel |
| Laptop day | Laptop brick, charging cables, phone lead, power bank | Fits the brick without bending its attached lead | Accommodates brick thickness without pressing on the opposite panel | Anchored charger pocket, battery pocket, cable channels |
| Full trip | Laptop kit plus tablet cable or another regional plug | Fits the regional adapter and leaves a spare cable position | Clears opposing loaded pockets without contact | Structured charger panel, separate battery pocket, spare cable slot |
These are fit rules rather than universal dimensions. External measurements don't tell you how much room remains after leather, lining, seams, padding, and pocket gussets occupy the interior. Measure your equipment with a ruler, then compare it with usable compartment dimensions or ask the seller for them.
Read the table against your actual equipment
For a phone day kit, lay the cable in a relaxed coil beside the earbud case and wall plug. A shallow layout is useful because you can identify everything without lifting a divider. Don't buy a deep central well just to store a short lead.
A commuter kit needs a different arrangement, not merely a larger pouch. The power bank should have its own retained position, while the GaN charger sits where its folding prongs or removable plug can't rub against another item. GaN describes the charger technology, not a guaranteed shape, so measure the actual unit.
For a laptop day kit, the brick determines the depth. Include any permanently attached mains lead and allow it to leave the housing naturally. A charger that fits only when its cable is folded hard against the strain relief doesn't fit.
A full trip kit adds awkward shapes rather than just more cable. A regional adapter may project farther than the charger itself, while a MagSafe-style puck needs a flat sleeve instead of a narrow elastic loop. Put the adapter against a supported panel, not over the earbuds.
Test the case inside the bag
A case that fits on your desk may be awkward inside a narrow briefcase. Compare its opening direction with the bag's opening, especially when choosing among leather laptop briefcases: you shouldn't need to remove documents to reach the organizer.
- Measure projections. Include fixed pins, plug shoulders, and cable exits, not just the main housing.
- Check opposing pockets. Loaded compartments can collide when the case closes, even though each looks spacious when open.
- Leave a spare position. A replacement lead or borrowed adapter shouldn't require rebuilding the entire layout.
Don't assume every European plug is wider than every US plug, or that every older charger is larger than a newer equivalent. Compare the equipment you own, with the correct destination plug fitted.
Fit test: Close the loaded case without squeezing its sides together. If the zipper needs to pull the contents into shape, choose a different layout.
Power Bank Rules Inside a Carry-On Case
The belief that a power bank can go into checked luggage is a more serious problem than untidy cables. IATA reports that 45% of travelers incorrectly believe power banks may be packed in checked baggage, while 33% don't realize that power banks and spare batteries have power limits. An organizer roundup that stops at pocket count misses the decision that matters most.
Spare battery and power bank limits
The following bands reflect the FAA's lithium-battery baggage guidance, which places ordinary spare lithium-ion batteries at up to 100 Wh, generally requires airline approval for 101–160 Wh units, and prohibits larger units under its passenger-baggage rules.
| Item | Watt-hour band | Where it rides | Extra step |
|---|---|---|---|
| Spare lithium-ion battery or power bank | Ordinary permitted band | Carry-on only | Protect terminals from metal |
| Spare lithium-ion battery or power bank | Higher approval band | Carry-on only | Obtain airline approval |
| Spare lithium-ion battery or power bank | Above the permitted passenger-baggage band | Not allowed in passenger baggage | Don't pack |
| Any spare battery or power bank in a gate-checked bag | Any allowed rating | Remove before the bag is checked | Pocket must open without unpacking |
Read watt-hours, not just the marketing label
Watt-hours measure stored energy; watts describe power. A high-output laptop charger and a power bank are not assessed in the same way just because both display a watt rating.
The conversion is:
Watt-hours = volts × amp-hours
For a hypothetical worked example, take a bank labeled 20,000 mAh at a nominal battery voltage of 3.7 V. Converting milliamp-hours to amp-hours gives 20 Ah; multiplying by 3.7 gives 74 Wh. That's an illustration of the calculation, not a substitute for the manufacturer's printed rating or airline acceptance.
Use the nominal battery voltage specified for the capacity, not an arbitrary USB output voltage. If the label is unreadable or the information is ambiguous, get the manufacturer's documentation before traveling.
Design for the gate-check interruption
A cabin bag can become a hold bag at the aircraft door. When that happens, spare batteries and power banks must come out before you hand it over. A battery compartment buried behind clothing defeats the point of having an organizer.
Choose a pocket you can reach while holding the case securely. Its closure should retain the bank without requiring you to thread it through tight elastic, disconnect unrelated accessories, or expose loose terminals to metal hardware.
This also affects how you pack a men's travel duffle bag. A roomy main compartment isn't enough if the charging kit ends up beneath shoes and clothing.
Check the operating airline's current rules, including restrictions on carrying, storing, and using power banks. Don't assume permission to carry a battery also means permission to use it during the flight.
A slightly roomier case with visible, accessible battery storage is a better choice than a compact pouch that requires force to open and repack.
Pockets Packing Order and Care
Pay for pockets that restrain the right item in the right direction. A decorative grid of identical elastic loops is cheap to understand in a product photograph, but a heavy adapter, a flat battery, and a delicate connector need different treatment.
Pockets worth paying for
An anchored charger pocket should support the adapter against the case's structural panel. Its opening needs enough retention to stop the brick falling out when you lift the open case, without gripping so tightly that you pull on an attached lead to remove it.
A nonconductive battery pocket needs its own closure and separation from keys, coins, exposed connectors, and metal zipper pulls. The FAA's PackSafe lithium-battery guidance specifically calls for protecting spare batteries against short circuits and preventing terminals from contacting metal. A leather exterior alone doesn't establish that the interior is suitably protective.
Cable channels should preserve a generous bend radius, meaning a broad curve rather than a tight turn. Repeated folding at the connector transition concentrates stress where the conductors and strain relief meet; a loop that forces that transition into a corner is poor design.
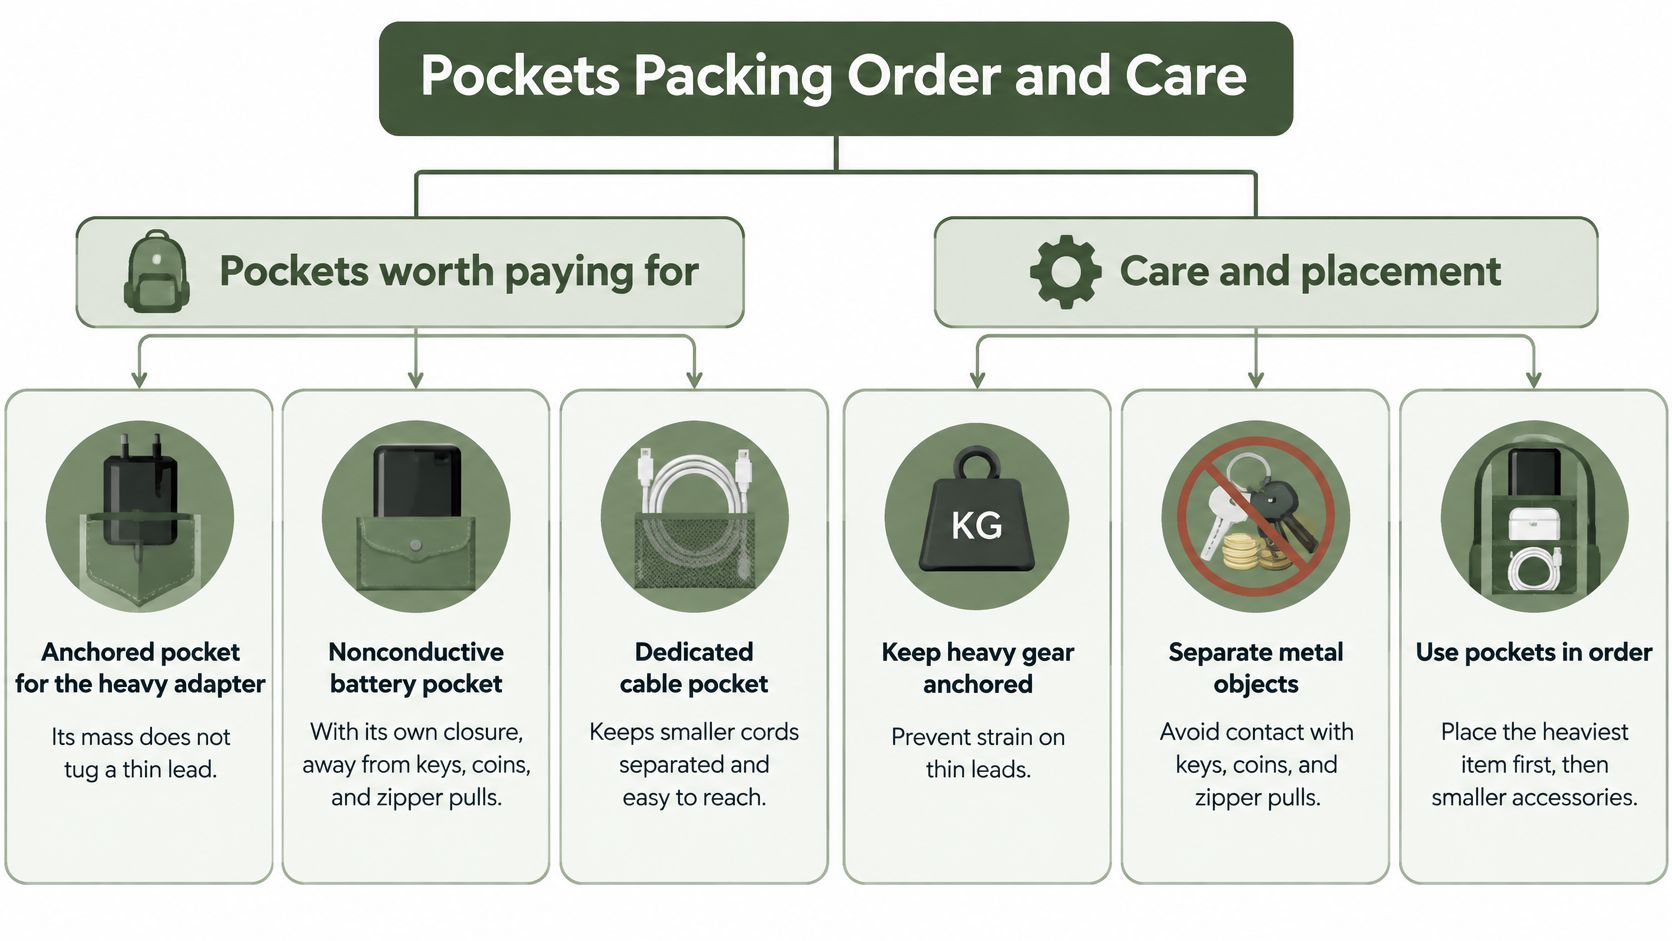
Flat sleeves suit earbud cases, small SSDs, card readers, and charging pucks. Check whether a sleeve is padded where it faces the charger, rather than assuming a soft lining provides impact protection.
An open panel makes inspection easier than a deep zipped well. That doesn't mean leaving batteries unsecured: combine visibility with retention, and remember that mesh isn't fire containment. A briefcase organizer insert can separate the case from documents and loose hardware, but it can't correct unsafe storage inside the case itself.
Pack for transport, then unpack for charging
- Secure the power bank. Place it in its dedicated pocket with terminals protected and no conductive objects alongside it. Don't pack a damaged bank for the trip.
- Coil cables loosely. Fasten each near the middle with a reusable strap. Leave connector housings free rather than forcing them beneath narrow elastic.
- Seat the heavy charger. Put it against the supported panel and arrange attached leads without tension. Make sure its prongs can't press into the battery pocket.
- Protect the small equipment. Slip earbuds and drives into their assigned sleeves, away from the brick's load.
- Position the closed kit. Keep its opening accessible near the carry-on's top, rather than wedging it beneath tightly packed belongings.
- Create an exposed charging area. At a hotel desk, remove the equipment from enclosed pockets and keep it visible on a clear, dry surface.
For aircraft use, EASA's 2025 recommendations advise carrying power banks on the person where possible or in accessible cabin baggage, and charging devices only through the aircraft's installed supply while monitoring them. Follow crew instructions and the operating carrier's restrictions rather than treating the case as permission to charge.
A storage case isn't a charging enclosure. Don't run a hot charger or power bank inside a closed, padded compartment.
If a device becomes hot, smokes, swells, or shows damage onboard, stop using it and alert the cabin crew immediately. Don't force it back into elastic, conceal it in the case, or handle a smoking device unnecessarily.
Keep grit and moisture out
After a trip, empty the case and remove grit with a soft brush or gentle vacuum attachment. Wipe the leather with a dry, soft cloth; clean the lining according to its material rather than applying leather conditioner throughout the interior.
Use conditioner sparingly, test it on a concealed area, and keep it off elastic and zipper tape. If the case gets wet, empty it and let it air-dry open away from radiators or direct heat. During routine cleaning, inspect pocket seams, stretched elastic, and the zipper where the loaded case bends.
Full-Grain Leather for a Case That Lasts
The shell matters because neatly separated gear can still be compressed inside a collapsing case. Full-grain leather can provide a firm, durable exterior, but the label alone doesn't tell you whether the charger panel has adequate support.
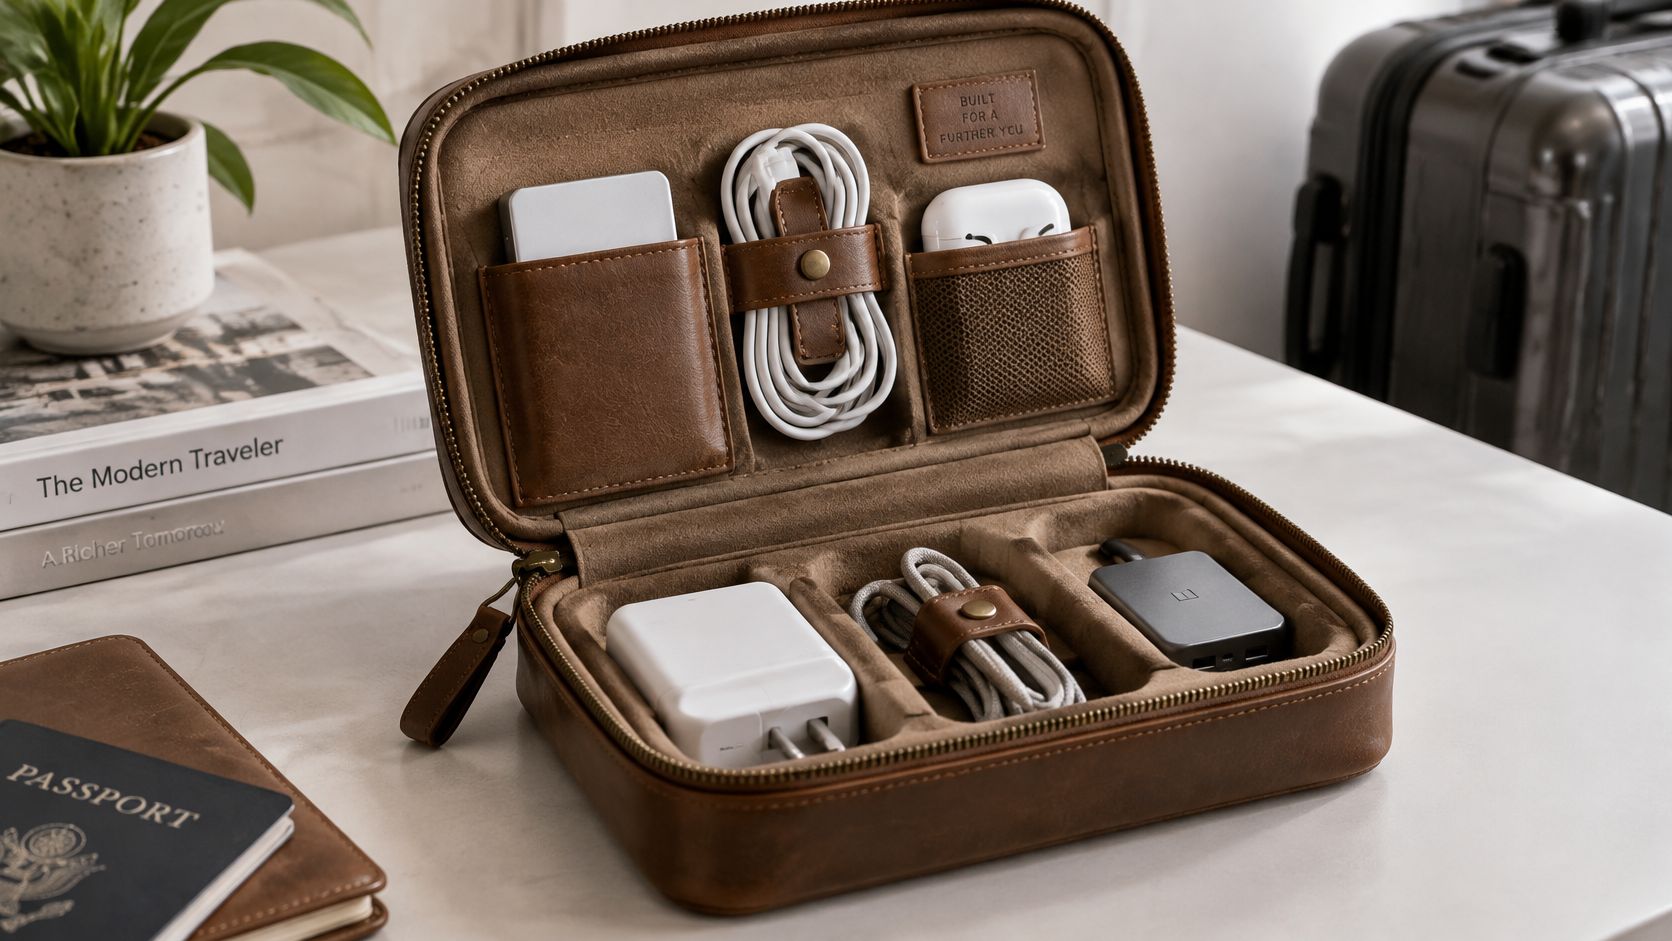
Compare construction before surface finish
Full-grain leather retains the hide's outer grain surface rather than having it sanded away. Its performance still depends on hide quality, thickness, tanning, stitching, and reinforcement. A well-made fabric case can protect equipment better than a poorly constructed full-grain one.
Crazy horse leather commonly describes a waxed, pull-up leather finish, often applied to cowhide. Handling moves waxes and oils within the surface, producing lighter scuffs and changes in tone. Confirm the underlying leather specification rather than assuming the finish name guarantees full-grain construction.
| Material | Useful strengths | Trade-offs to inspect |
|---|---|---|
| Full-grain leather | Substantial feel, maintainable surface, attractive handling wear | More weight, moisture care, construction-dependent stiffness |
| Nylon or polyester | Lightweight options, flexible packing, weather-resistant finishes available | Panel support may require reinforcement; coatings and zippers affect weather protection |
| Corrected-grain leather | More uniform appearance, potentially practical protective finish | Heavy coatings can obscure quality and change how wear appears |
| Bonded leather | Consistent initial appearance | Surface peeling and weak fold durability can make repair impractical |
Corrected-grain leather isn't automatically weak, and genuine leather isn't a precise quality grade. Ask what the material is. Bonded leather is a different construction from an intact hide and isn't my choice for a case that will repeatedly flex around loaded pockets.
Judge the case with your hands
Press the charger panel, flex the hinge, and inspect the seam allowances where pockets join the lining. The panel should resist folding around the loaded brick; the hinge should open without dragging pocket contents across each other.
Leather develops creases and patina, but cracked coatings, separating layers, and torn pocket anchors aren't desirable aging. Understanding full-grain leather lifespan means distinguishing maintainable wear from structural failure.
For daily professional carry, I'd choose full grain when the panel, lining, and zipper are equally well specified. For persistent rain or ultralight travel, a reinforced fabric shell is often the more sensible compromise.
Material check: A leather shell should support the layout, not merely dress up an unstructured pouch.
Neither material makes the case waterproof by default. Check closures and seams, and don't stretch a rigid case around excess contents because the leather will eventually soften.
Match the Case to the Trip You Actually Take
Buy for the trip you repeat, not the expedition you imagine. A phone-focused traveler gets more from a shallow case with fixed positions for the lead, plug, and earbuds than from deep layers that sit empty. Extra capacity you never load is just extra bulk at security.
A laptop traveler needs a stable charger position and independent battery storage. Refuse a layout that leaves the brick and bank loose in a shared well, even when the product photograph looks orderly. For frequent flyers, I'd take a quick-opening battery pocket over a slightly slimmer silhouette every time, because inspection at the gate is where that choice pays off.
Make the material fit the journey
Daily office and airport use suits a firm full-grain shell, especially when you want a case that looks right beside a portfolio. Ultralight trips and repeated wet conditions favor a lighter reinforced fabric. People comparing leather bags for digital nomads should also weigh how often the kit moves between accommodation, coworking desks, and transit, since that cycle decides how hard the hinges and pocket anchors work.
Grainmark Leather offers full-grain leather tech organizers for cables and devices alongside its work bags and specialist cases. Whatever you compare it against, check pocket dimensions and battery access against your own charger, power bank, and leads rather than the stated capacity.
An overseas trip puts equipment organization next to documents, destination requirements, and arrival planning. A resource on how to prepare for international travel covers that wider checklist, while your operating airline sets the battery carriage rules that govern the case itself.
Check before you buy
- List the rigid items. Include the fitted regional plug and any permanently attached leads.
- Read battery labels. Record the printed watt-hours and resolve unclear specifications before departure.
- Match the layout to the charger shape. The device name alone tells you nothing about brick dimensions.
- Test access and closure. The battery should come out without disturbing the rest of the bag, and the case should close without compression.
- Compare construction. Look for supported panels, retained pockets, sound stitching, and room for relaxed cable coils.
The right case makes a missing lead or a damaged accessory obvious at a glance. On a work trip, that visibility beats maximum capacity in minimum space.
Grainmark Leather offers full-grain leather tech organizers, work bags, and specialist cases for daily carry and travel. Visit Grainmark Leather to compare organizer layouts with your charger, battery, and cable kit before buying on pocket count alone.