
Article: Jewelry Drawer Tray: How to Choose the Right One
Jewelry Drawer Tray: How to Choose the Right One
You open the dresser drawer looking for one pair of earrings and find a small archaeology site instead. Rings have rolled into the corners, a necklace has become a tight knot, and the watch you wear most often is buried beneath pieces you rarely touch. The drawer has plenty of space, but none of it is working.
That problem usually starts with the tray. Buyers choose a velvet color or an attractive compartment pattern, then discover that the insert catches on the drawer, leaves a dead strip of wasted space, or sits too high to close properly. My rule is simpler: fit first, layout second, lining third, maintenance last. A beautiful jewelry drawer tray that doesn't clear the drawer is just an expensive obstruction.
Why the Right Jewelry Drawer Tray Changes Everything
An empty drawer looks generous until you account for slides, side walls, the front lip, and the drawer above it. The usable space is smaller than the visible opening, and a tray has to move through that space without rubbing. If it doesn't, every opening becomes a small jolt that can shift rings, catch chains, and force you to handle the tray instead of the jewelry.
The category itself is no longer a niche storage idea. The jewelry organizer market is projected to grow from USD 29.6 billion in 2025 to USD 72.6 billion by 2036, at a projected 8.5% CAGR, and drawer inserts are listed among the major formats alongside jewelry boxes, travel cases, hanging organizers, and wall-mounted organizers in the jewelry organizer market reference. That broader market matters because it gives you more formats to compare, but it also creates more opportunities to buy a tray designed for display rather than daily drawer use.
Start with the drawer, not the jewelry
A drawer tray performs three jobs. It must stay stable during movement, keep pieces apart, and use the available height without blocking the drawer above. Decoration is a distant fourth consideration. The frame, base, dividers, and clearance determine whether the tray will still feel useful after the novelty wears off.
A technically solid design commonly uses a rigid 2-inch class frame, a 3/8-inch MDF structure, a 1/8-inch hardboard base, 1/16-inch velvet lining, and 1/2-inch MDF dividers, with a removable ring holder, as described in the standard jewelry tray construction specifications. That layered construction isn't just cabinet-shop theater. A stiff frame resists twisting, a firm base limits sag, and a soft contact surface keeps metal from scraping directly against a hard substrate.
Practical rule: If a tray's frame flexes when you lift it from one corner, don't trust its dividers to stay aligned in a moving drawer.
A good tray makes the collection easier to see because every piece has a sensible home. A poor one disguises disorder under a regular grid. Rings still slide into corners, earrings still become separated from their backs, and long chains still cross through neighboring compartments.
The right buying order is therefore essential:
- Fit: Confirm width, depth, height, and drawer movement.
- Layout: Assign space according to the pieces you wear.
- Material: Choose a lining that suits contact, dust, and moisture conditions.
- Maintenance: Make sure the tray can be cleaned, inspected, and reconfigured.
Choose in that order and you avoid the most common failure. Choose by appearance and you'll often end up replacing a tray that never belonged in the drawer.
Measure Your Drawer Before You Measure Your Collection
Take the drawer out if the furniture allows it. Measuring the opening from above isn't enough because the box may taper, the front may have a thicker face, and the slides may narrow the usable path. You need the interior dimensions where the tray will sit and travel.
Use three measurements in the right order
First, measure interior width at the front. Measure between the inside walls just behind the drawer face, where the opening is most likely to pinch a rigid tray. Then measure again farther back. Do not assume the back is identical. A tray can appear narrow enough on paper yet jam against the front lip when you push it in.
Second, measure usable depth. Place the tape from the inside front to the rear wall, not from the outside face of the furniture. Check whether hinges, slide hardware, or a curved back panel steal space. Depth determines whether a full tray can sit flat and whether a necklace compartment can hold a pendant without forcing it against the divider.
Third, measure vertical clearance. Measure from the drawer floor to the underside of the drawer above, or to the lowest obstruction inside the cabinet. Include the tray frame, the tallest compartment insert, and any lid or second tier. Stackable systems need particular caution because each added layer consumes clearance that a single tray doesn't.
Record the three measurements in a note, and photograph the empty drawer from above. The image catches details that numbers miss, such as a recessed floor, uneven side walls, or slides that rise above the base.
Market inserts illustrate why measurement matters. Small-format organizers are commonly listed around 13.8 by 9.5 by 1.2 inches, while full-width cabinet inserts can be about 26.4 by 18.2 by 3.1 inches, according to market-available jewelry drawer insert examples. Those are different engineering targets, not interchangeable versions of the same product. One prioritizes portability and shallow storage. The other assumes a deeper cabinet and a more committed installation.
Allow for movement, not just insertion
A tray can fit inside a stationary drawer and still fail in use. Test whether the drawer can open fully without the tray touching the cabinet frame. Check whether the front edge catches as you close it. If you're stacking inserts, move the drawer slowly and listen for rattling or contact between tiers.
Measure the route the tray takes, not just the rectangle it occupies when the drawer is open.
Guidance on retrofitting jewelry trays also emphasizes that there is no universal size, and that width, depth, and height should be checked before ordering. A commonly referenced trade footprint is around 370 by 210 millimeters, but that standard doesn't solve a mismatched older cabinet, as explained in this drawer jewelry tray retrofit guide. Treat standard dimensions as a starting point, never as permission to skip the tape measure.
Tray Formats and How They Fit Real Drawers
Three formats cover most real-world installations. None is automatically superior. The right choice depends on clearance, how often the collection changes, and whether the tray must stay fixed while the drawer moves.
| Format | Fit Tolerance | Reorganization | Clearance Needed | Draw Movement |
|---|---|---|---|---|
| Stackable modular insert | Forgiving when used as separate units, but sensitive to height | High, removable dividers and tiers can change | More vertical room, especially with multiple levels | Can rattle or shift unless restrained |
| Full-width cabinet tray | Low, it must match the drawer closely | Limited, fixed layout is common | Uses the available height efficiently if fitted correctly | Stable and quiet when properly fitted |
| Standalone valet tray | Most forgiving of slight width errors | Moderate, easy to move or replace | Usually low, depending on frame depth | May slide unless weighted or recessed |
Stackable modular inserts suit a collection that changes. You can give rings one tier and watches another, then rearrange the system when your routine changes. Their weakness is vertical clearance. A drawer that accepts one shallow insert may not accept two, and loose modules can tap against each other when the drawer is opened quickly.
Full-width cabinet trays create the cleanest installation. They cover the drawer floor, reduce the chance that a small earring back slips underneath, and make the interior feel intentional. The compromise is commitment. If the fixed pattern gives too much space to rings and too little to necklaces, the entire tray becomes a daily reminder of a poor decision.
Standalone valet trays are the practical choice for uncertain furniture. They can move from a drawer to a dresser top, and their loose fit is useful when the drawer has unusual walls or a shallow rear section. They need a grippy base, weight, or a recessed floor, though. Otherwise, the tray moves every time the drawer does.
For broader cabinet planning, the kitchen corner carousel storage guide is useful because it treats access, dead space, and movement as design problems rather than decoration problems. The same principle applies to a jewelry drawer. A tray that makes every compartment reachable beats one that merely fills the available footprint.
You can also compare how a loose tray behaves with a more presentation-oriented jewelry display tray. Display trays prioritize visibility and handling, while drawer inserts prioritize clearance and stability. Don't assume one format can perform both jobs equally well.
My format recommendation
Choose a full-width tray when the drawer dimensions are reliable and your collection is stable. Choose modular inserts when you expect the mix to change or need to separate daily pieces from occasional ones. Choose a valet tray when you rent, travel between rooms, or can't verify the drawer's internal geometry.
The format should answer the drawer's physical problem first. Compartment count comes later.
Lining Materials and What They Actually Do to Your Jewelry
Lining is not a luxury detail. It controls how jewelry contacts the tray, how easily dust is removed, and how much moisture can remain around a piece after wear. Yet the material name alone tells you less than the way it is finished and installed.
Leather-lined trays have a firm, structured feel and can age attractively, but I don't treat every leather lining as automatically jewelry-safe. Finishes, dyes, adhesives, and the condition of the surface matter. A rough or heavily finished leather can create more friction than a plain, smooth textile, especially where a chain is repeatedly dragged into a compartment.
Velvet and felt offer a soft landing and make dark metals easy to see. Their pile can collect lint, skin oils, and dust, so they need gentle cleaning and dry storage conditions. Suede has a similar tactile quality, with a nap that can hold small particles. Coated fabric and microfiber are usually easier to wipe and can be a sensible choice for pieces handled often.
| Liner Material | Effect on Polished Metal | Effect on Plated Finish | Moisture Behavior |
|---|---|---|---|
| Leather | Firm contact, surface quality matters | Test unknown dyes and finishes before extended contact | Relatively closed, depends on treatment |
| Velvet or felt | Soft contact, can collect grit in the pile | Gentle when clean, abrasive particles are the concern | Can retain moisture and oils |
| Suede | Soft, stable contact when kept clean | Suitable for careful storage, but inspect the nap | Holds particles and some moisture |
| Coated fabric or microfiber | Low-friction surface when clean | Practical for frequent handling | Usually easier to wipe, backing may reduce airflow |
Match the liner to the collection
For polished pieces that are worn frequently, I prefer a smooth, cleanable surface over a deep pile that hides grit. For delicate items that sit untouched, a soft textile can work well if the drawer stays dry and the lining is inspected. Plated finishes deserve extra caution because the surface layer is not the same as the underlying metal. A liner that looks soft can still become a problem if dust collects between the fibers.
Don't confuse softness with protection. A cushion protects against hard impact, but it doesn't remove the need to separate pieces or keep the surface clean. A necklace dragged across a dirty plush lining still experiences friction.
The practical distinctions between nap, weave, backing, and cleanability are laid out more fully in this comparison of suede lining versus fabric. Use those distinctions when a product page gives you only a color and the word “luxury.”
A neutral, clean surface is more useful than an impressive surface that cannot be maintained.
Also inspect the underside. Silicone-backed or rubber-backed materials may grip the drawer, but they can limit airflow and trap conditions beneath the tray. If the drawer is humid, a removable liner or ventilated base is easier to live with than a permanently sealed cushion.
Compartment Layouts for Rings, Earrings, Necklaces, and Watches
Build the layout around the way each piece is worn. A catalog photograph may show a symmetrical grid, but symmetry doesn't stop a chain from tangling or keep a watch case from pressing against a bracelet.
Give each category the shape it needs
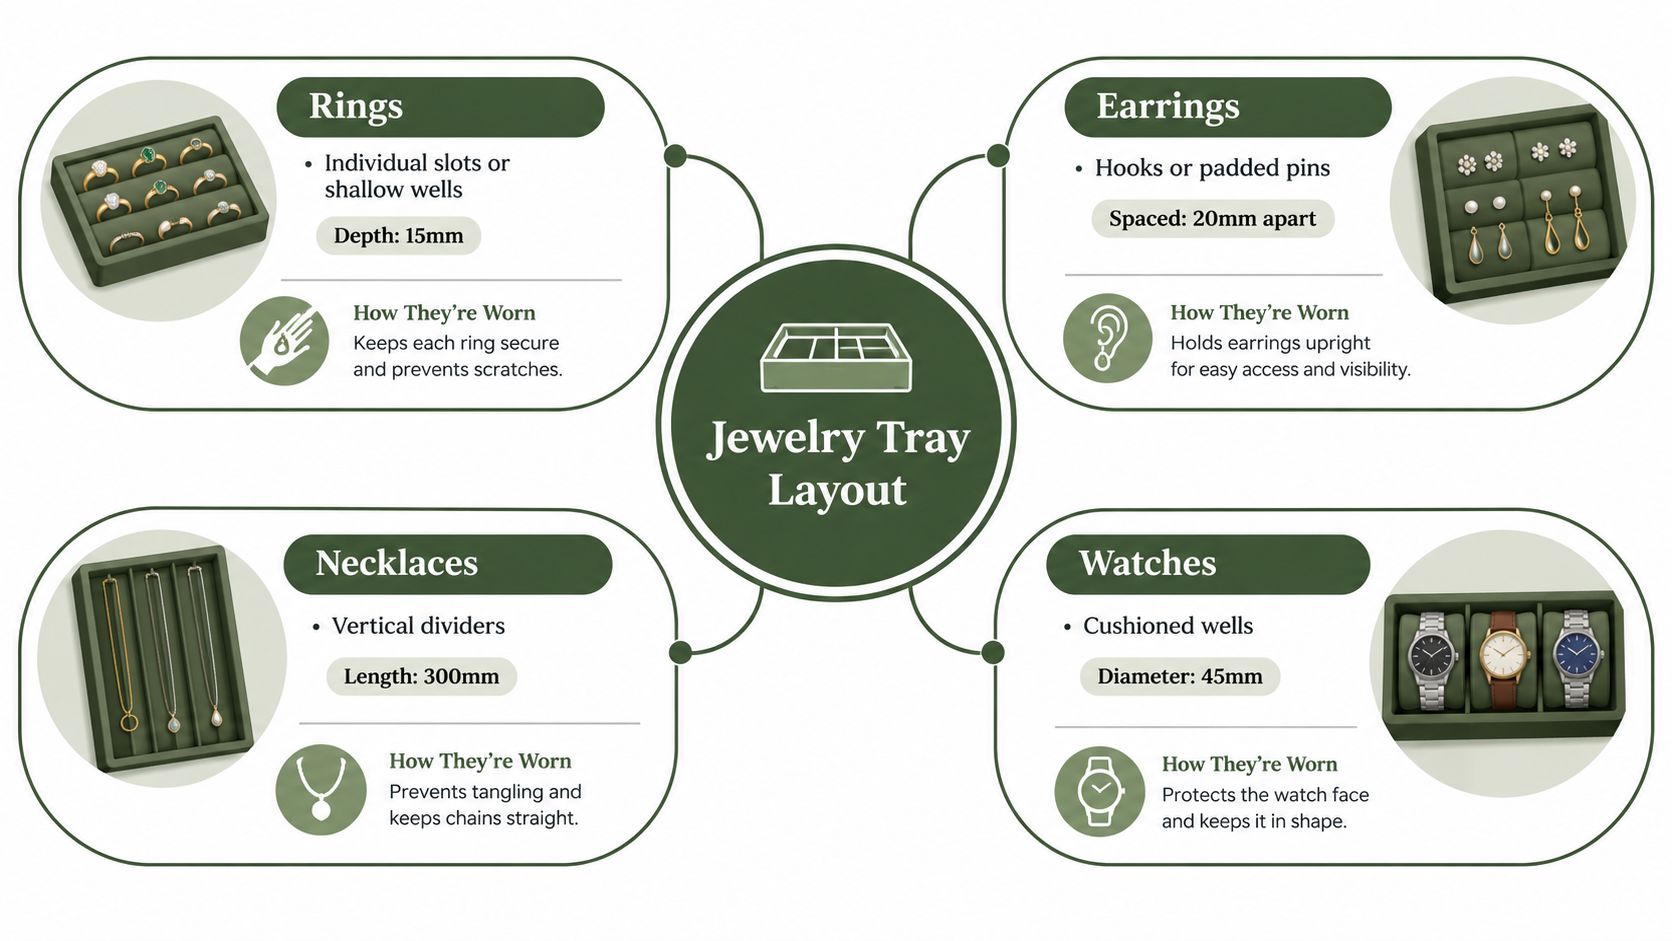
Rings need separation and visibility. Individual slots or shallow wells stop bands from rolling into one another while keeping stones visible from above. Deep ring rolls can look refined, but they waste access if you wear several rings every day.
Earrings need pair control. Studs work in small matched sections where the front and back stay together. Hoops and larger drops need wider, shallower spaces so posts don't bend and the pieces don't scrape against neighboring compartments. A single broad earring section often works better than a field of tiny squares.
Necklaces need length and restraint. Use long channels, raised dividers, or a soft groove that keeps the pendant from crossing into another chain's path. Fasten the clasp before storage. For a delicate chain, a separate narrow compartment is worth more than several extra ring slots.
Bracelets need open wells. Flat rectangular sections suit cuffs and chain bracelets, while a cushioned roll can hold flexible pieces without forcing them into a knot. Leave enough room to lift the bracelet out without dragging it across the divider.
Watches need support, not pressure. A pillow or angled cushion should hold the case while allowing the strap or bracelet to rest naturally. A watch compartment that's too tight makes removal awkward and can press against the crown or clasp.
Resolve the proportion conflict
Watch wells and earring sections often compete for the same drawer area. Watches need width and cushioning, while earrings benefit from compact separation. If you force both into one uniform grid, one category will be badly served. Give the largest or most frequently handled category the best real estate, then use the remaining space for smaller pieces.
For practical household planning beyond jewelry, these closet organization tips from Aureli Construction are a useful reminder to organize around access and use rather than just filling every available space. That principle keeps a tray functional after the initial sorting session.
A watch collection may also need a dedicated format rather than a compromised jewelry grid. Compare the support and cushioning approach in this watch storage box for men before assigning valuable timepieces to a generic compartment.
The correct compartment is the one that lets you remove the piece without disturbing its neighbors.
Count what you wear, not what you own. If three necklaces rotate through the week and twenty rings stay untouched, don't sacrifice the necklace channels to create a dramatic ring wall.
When Fewer Compartments Beat a Dense Grid
More compartments feel productive because they make the tray look organized before you put anything inside it. Once the jewelry arrives, dense grids often reveal their weakness. Small squares suit matching studs and uniform bands, but they fragment larger pieces and force necklaces, cuffs, or statement earrings into spaces that don't fit.
A simpler layout makes the collection legible. You can identify a piece by its silhouette instead of remembering which tiny square contains it. That matters when your daily rotation changes or when you want to see less frequently worn pieces without emptying the drawer.
Use the rotation as the design brief
Start with the pieces you reach for most. Give them open, visible compartments near the front. Put occasional pieces farther back or on a lower tier if the drawer has enough clearance. This approach makes the tray serve your routine rather than your inventory list.
A dense grid makes sense when the collection itself is dense and consistent. Matching earrings, slim rings, and small charms benefit from individual separation. A mixed collection needs more generous zones, because one fixed square cannot accommodate a cuff one day and a pendant the next.
Removable dividers offer a workable compromise. You can open a pair of sections for a larger bracelet or divide a broad well when new rings arrive. The tradeoff is movement. Loose dividers can shift under repeated drawer use, so look for channels, friction fits, or a base that keeps them aligned.
- Choose a dense grid when most pieces are small and similar in size.
- Choose broad wells when statement pieces and bracelets dominate.
- Choose adjustable sections when the collection changes regularly.
- Choose dedicated channels when necklaces are the main source of disorder.
The marketing promise of maximum capacity is often misleading. A tray isn't efficient if every compartment is technically occupied but difficult to use. Empty space around a piece is sometimes the feature that prevents scraping, tangling, and awkward removal.
The most disciplined layout may contain fewer divisions than the product photograph suggests. Keep enough structure to separate categories, then stop dividing when the compartments begin to slow you down.
Tarnish, Humidity, and Long-Term Jewelry Care in a Drawer
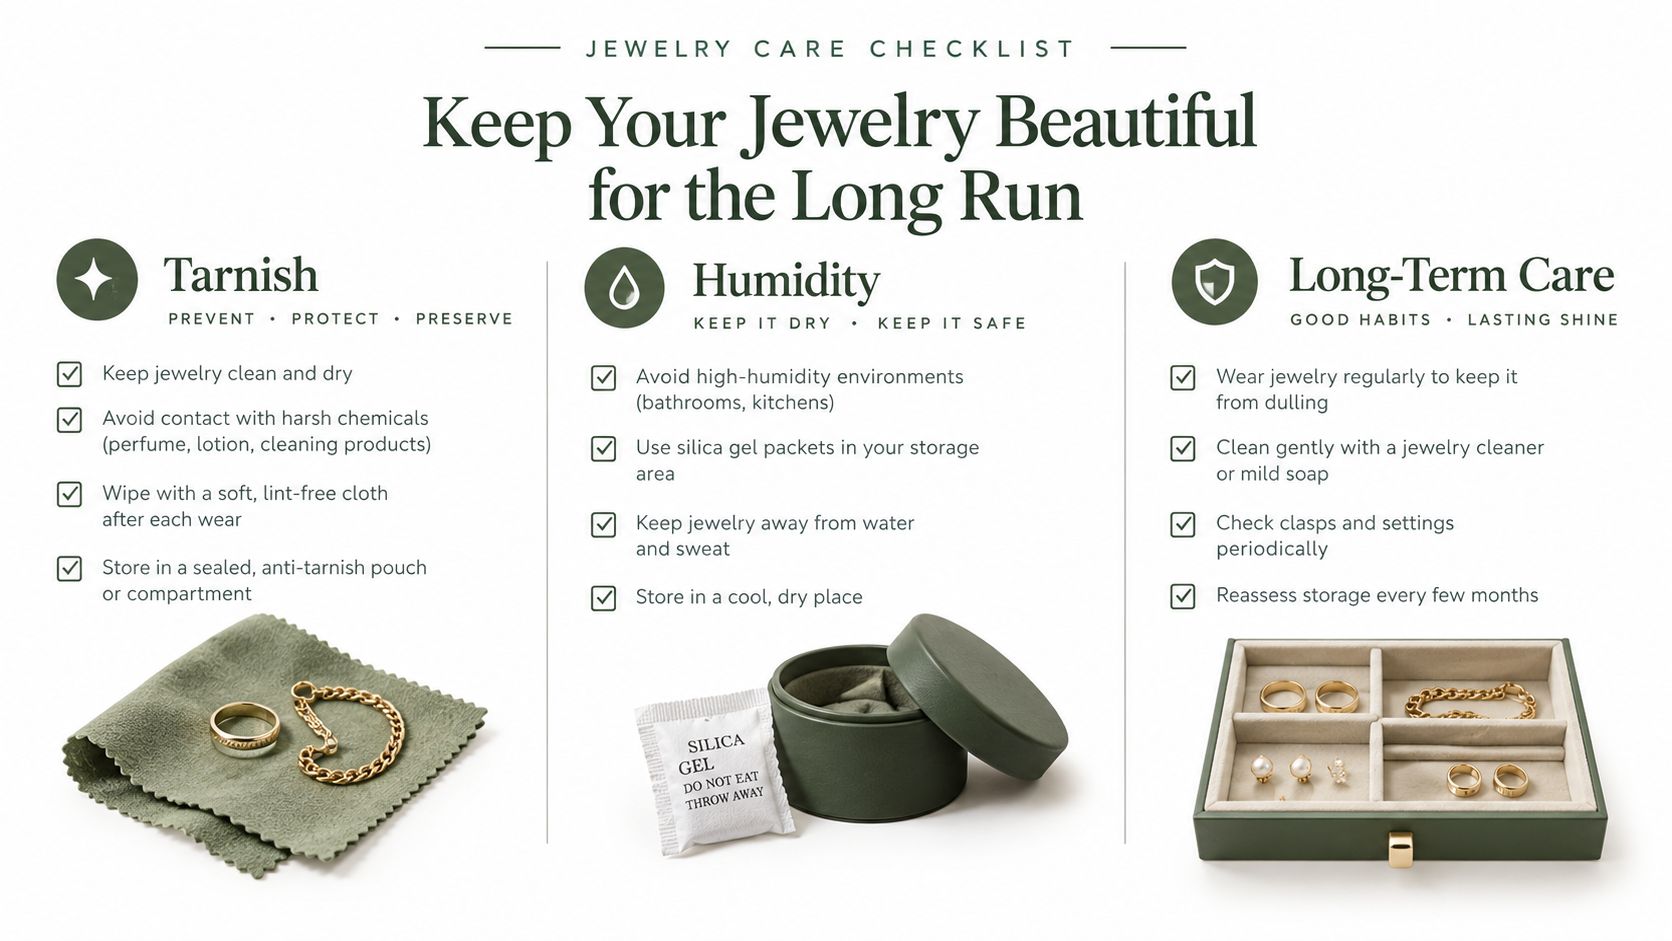
A closed drawer can protect jewelry from light and casual knocks, but it can also hold moisture and stale air. Silver, brass, and plated pieces need more than a soft bottom when the surrounding environment is humid. Airflow, clean surfaces, and sensible separation matter as much as the tray's appearance.
Anti-tarnish fabrics, silica gel, and similar products can help manage the storage environment, but none should be treated as permanent. Independent guidance recommends considering anti-tarnish-treated fabrics or airtight compartments, adding digital hygrometers, using silica gel where appropriate, and replacing liners rather than assuming they remain effective indefinitely, as outlined by Closet Boxes storage guidance.
Build maintenance into the drawer routine
Start with a light surface inspection. Remove jewelry before wiping the tray, and use a soft, dry cloth that won't leave grit behind. Don't soak a lined insert inside the cabinet. Moisture introduced during cleaning can remain under cushions or in seams.
Check the drawer environment as well as the jewelry. A digital hygrometer can show whether the drawer is consistently damp, while a small desiccant packet can help in a suitable dry-storage setup. Replace or rotate moisture-control products when they are spent. They aren't decorative accessories.
- Inspect the lining: Look for crushed pile, loose edges, dust, and exposed hard surfaces.
- Check the jewelry: Pay attention to pieces that become dull faster than usual or show residue near settings.
- Review the airflow: Avoid sealing a damp tray inside a drawer and then adding more fabric around it.
- Separate watch straps: Leather watch straps shouldn't share a moisture-trapping compartment with damp felt or recently cleaned pieces.
- Refresh the layout: Move rarely worn pieces if daily items are rubbing against the front edges.
For packaging decisions that involve pouches, wraps, and other soft storage, this guide on how to choose packaging for retailers offers useful material and handling context. A pouch can protect an individual piece, but it shouldn't become an excuse to overfill a tray or trap damp jewelry.
The right maintenance rhythm is simple. Wipe tray surfaces every few months, inspect the liner twice a year, and perform a full refresh whenever pieces begin looking dull sooner than expected. Replace a liner when it has become permanently compressed, dirty, or loose. A tray is part of the care system, not a sealed solution that removes the need for care.
For a compact alternative to a fixed drawer installation, compare the construction and compartment logic of a gold jewelry box. The same principles apply, especially clean contact surfaces, separation, and access.
Putting It All Together for Your Drawer
Make the decision in one sitting, but do it in the correct sequence. Remove the drawer, measure the usable width at the front and back, measure depth, and record the vertical clearance. Photograph the empty interior, including slides and obstructions, before you look at tray patterns.
Use those measurements to eliminate unsuitable formats. A stackable modular system needs spare height and benefits from reconfiguration. A full-width tray needs close dimensional control but gives the drawer a stable, finished interior. A standalone valet tray is the safest choice when the furniture is irregular or the insert may need to move between locations.
Let the collection set the layout
Count the pieces you wear most often, then assign space by category. Give rings separated wells, earrings a pair-keeping area, necklaces long channels, bracelets open sections, and watches cushioned support. Don't build a dense grid just because the tray offers one. If the compartments are too small for the pieces you reach for, the organizer has failed its main job.
Choose the lining with maintenance in mind. A soft surface should be cleanable, stable, and appropriate for the environment where the drawer sits. Be cautious with unknown coatings, rubber-backed materials, and deep pile in a humid drawer. The surface needs to protect jewelry without hiding dust or limiting airflow.
A finished collection of travel and storage formats can be reviewed through the Grainmark Leather jewelry cases collection, which includes jewelry-focused organizers designed for protected storage beyond a fixed dresser drawer. Treat that as a separate option when portability matters more than a built-in installation.
Fit the tray to the drawer first. Fit the compartments to the collection second. Everything else is finish work.
Set a recurring inspection point after installation. Wipe the base, check the dividers, inspect the lining, and replace moisture-control products when needed. If the tray catches, rattles, or forces you to stack pieces that should be separate, fix the tray rather than adapting your jewelry to a bad fit.
A jewelry drawer tray should disappear into the furniture during daily use. It should open smoothly, keep the pieces visible, and stay quiet when the drawer moves. Choose that performance over a crowded grid or fashionable finish, and the tray will remain useful long after the first reorganization.
Grainmark Leather offers jewelry cases and travel organizers for people who need compartmentalized protection beyond a fitted drawer. Visit Grainmark Leather to compare those storage options with your drawer measurements and choose a format that suits how you carry and store your jewelry.